月度归档:2017年07月

比ldd更好用的strace命令

strace -o whoami-strace.txt whoami
执行ldd会显相关依赖的最终结果,而strace则显示依赖的检查过程。

strace -o whoami-strace.txt whoami

open("/lib/libnss_files.so.2", O_RDONLY) = -1 ENOENT (No such file or directory)
open("/lib/i686/mmx/libnss_files.so.2", O_RDONLY) = -1 ENOENT (No such file or directory)
stat64("/lib/i686/mmx", 0xbffff190) = -1 ENOENT (No such file or directory) 
open("/lib/i686/libnss_files.so.2", O_RDONLY) = -1 ENOENT (No such file or directory)
stat64("/lib/i686", 0xbffff190) = -1 ENOENT (No such file or directory)
open("/lib/mmx/libnss_files.so.2", O_RDONLY) = -1 ENOENT (No such file or directory)
stat64("/lib/mmx", 0xbffff190) = -1 ENOENT (No such file or directory) 
open("/lib/libnss_files.so.2", O_RDONLY) = -1 ENOENT (No such file or directory)
stat64("/lib", {st_mode=S_IFDIR|0755, st_size=2352, ...}) = 0
open("/usr/lib/i686/mmx/libnss_files.so.2", O_RDONLY) = -1 ENOENT (No such file or directory)
stat64("/usr/lib/i686/mmx", 0xbffff190) = -1 ENOENT (No such file or directory) 
open("/usr/lib/i686/libnss_files.so.2", O_RDONLY) = -1 ENOENT (No such file or directory)
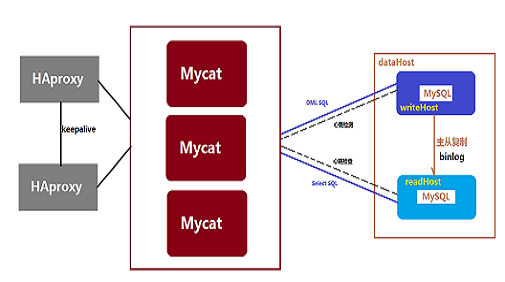
MySQL高可用主从分离

http://www.mycat.io/
一个彻底开源的,面向企业应用开发的大数据库集群
支持事务、ACID、可以替代MySQL的加强版数据库
一个可以视为MySQL集群的企业级数据库,用来替代昂贵的Oracle集群
一个融合内存缓存技术、NoSQL技术、HDFS大数据的新型SQL Server
结合传统数据库和新型分布式数据仓库的新一代企业级数据库产品
一个新颖的数据库中间件产品

tensorlayer

http://tensorlayer.org/
———
TensorLayer 是为研究人员和工程师设计的一款基于Google TensorFlow开发的深度学习与强化学习库。 它提供高级别的(Higher-Level)深度学习API,这样不仅可以加快研究人员的实验速度,也能够减少工程师在实际开发当中的重复工作。 TensorLayer非常易于修改和扩展,这使它可以同时用于机器学习的研究与应用。 此外,TensorLayer 提供了大量示例和教程来帮助初学者理解深度学习,并提供大量的官方例子程序方便开发者快速找到适合自己项目的例子。

———————-
百度深度学习
语音识别
https://github.com/mozilla/DeepSpeech
https://github.com/PaddlePaddle/Paddle
Paddle开源,训练库。
http://www.paddlepaddle.org

tensorFlow的安装

Linux的安装

1.下载Anaconda 4.4.0,最牛B的机器学习库、
  wget https://repo.continuum.io/archive/Anaconda2-4.4.0-Linux-x86_64.sh

2.bash Anaconda2-4.4.0-Linux-x86_64.sh  //会自动安装python2.7的版本
中文版:https://repo.continuum.io/archive/Anaconda3-4.4.0-Windows-x86_64.exe,python3.6

3.conda create -n tensorflow python=2.7,创建新的环境
conda remove -b tensorflow --all,删除环境

4.source activate tensorflow 激活新环境
source deactivate tensorflow 禁用环境

5.安装tensorflow
pip install --trusted-host pypi.douban.com --ignore-installed --upgrade https://storage.googleapis.com/tensorflow/linux/cpu/tensorflow-1.2.1-cp27-none-linux_x86_64.whl

中文
pip install --trusted-host pypi.douban.com --ignore-installed --upgrade https://storage.googleapis.com/tensorflow/windows/cpu/tensorflow-1.2.1-cp36-cp36m-win_amd64.whl
pip install --trusted-host pypi.douban.com --ignore-installed --upgrade https://storage.googleapis.com/tensorflow/windows/cpu/tensorflow_gpu-1.2.1-cp36-cp36m-win_amd64.whl

注:--trusted-host pypi.douban.com,在失败时,根据提示增加或修改该项
----------------
注:https://storage.googleapis.com/tensorflow/在该页面搜索“-cp27-none-linux_x86_64.whl”的最新版本
----------------------------------
报错:/lib64/libc.so.6: version `GLIBC_2.14'版本时,请到http://www.gnu.org/software/libc/中查找相应的版本进行安装

Window的安装

Installing with Anaconda

The Anaconda installation is community supported, not officially supported.

Take the following steps to install TensorFlow in an Anaconda environment:

Follow the instructions on the Anaconda download site to download and install Anaconda.
Create a conda environment named tensorflow by invoking the following command:

C:> conda create -n tensorflow python=3.5 
Activate the conda environment by issuing the following command:

C:> activate tensorflow
 (tensorflow)C:>  # Your prompt should change 
Issue the appropriate command to install TensorFlow inside your conda environment. To install the CPU-only version of TensorFlow, enter the following command:

(tensorflow)C:> pip install --ignore-installed --upgrade https://storage.googleapis.com/tensorflow/windows/cpu/tensorflow-1.2.1-cp35-cp35m-win_amd64.whl 
To install the GPU version of TensorFlow, enter the following command (on a single line):

(tensorflow)C:> pip install --ignore-installed --upgrade https://storage.googleapis.com/tensorflow/windows/gpu/tensorflow_gpu-1.2.1-cp35-cp35m-win_amd64.whl 
Validate your installation

Start a terminal.

If you installed through Anaconda, activate your Anaconda environment.

Invoke python from your shell as follows:

$ python
Enter the following short program inside the python interactive shell:

>>> import tensorflow as tf
>>> hello = tf.constant('Hello, TensorFlow!')
>>> sess = tf.Session()
>>> print(sess.run(hello))
If the system outputs the following, then you are ready to begin writing TensorFlow programs:

Hello, TensorFlow!
If you are new to TensorFlow, see Getting Started with TensorFlow.

If the system outputs an error message instead of a greeting, see Common installation problems.

android实用开源库

所有组件,类似awesome-android那个。
https://github.com/Trinea/android-open-project
———-
阿里牛人开源的库,感觉common库比较实用,其它库可以参考一下。
https://litesuits.com/?f=zh
—-
动态插件系统的例子
https://github.com/mmin18/AndroidDynamicLoader
—-
快速开发的SDK,基于flagment定制了很多UI组件。
https://github.com/liaohuqiu/cube-sdk
https://github.com/liaohuqiu/android-cube-app
——–
进程Daemon
https://github.com/liaohuqiu/MarsDaemon

摘:一念行者

早晨清醒来,如果你有一个念头想起觉知,
那么,就有意识地下床,有意识地穿鞋子,有意识地抬起你的脚,
有意识地去卫生间……然后有意识地刷牙,有意识地洗脸,
然后有意识地驾车或骑车去上班。
然后,有意识地工作……
如此对自己的一切所作所为保持个“知”的状态,
这就是“正念觉知”。
它是由一个念头发起,一种以“正念”止“乱念”的方式。
这是有为法的觉,也叫妄觉。
但,如果你就这样不停地练习、练习、练习,
有一天你会发现,这种有为的觉突然“脱落”,你进入了一种不用努力的觉。
同时你也看到了无量无边的光明,周彻一切。
这个过程叫“放大光明”,你所见到的觉叫“本觉”。
当你来到“本觉”,光明普照天地,
此时你的觉行感觉更透彻、更利索、更清晰、更加愉悦和快乐。
跳,你跳在自己不动的见性里;走,你走在无边的不动国。
山,安稳在你的真心里;水,歌唱在你的自性中。
你自己日夜行住坐卧在自己不动的心地上,一切自然而清明。
此时你的觉毫不费力气,这叫“无为法的觉”;
你感到一切像光明照着梦境一样,这叫作“生活在本觉之中”,也叫安住在“空性”之中。
如果你来到这种境地,你想有意识地呆在这种情景里,这叫“守觉”或“守真心”;
也叫“端坐念实相”,也叫“实相念佛”,也叫“安住涅槃城”,也叫“入住大光明”,也叫“活在当下”……
总之,它有很多名称,但指的都是同一情形。
这是最后的境界了吗?当然不是。
如果这样,有为法的觉时,你叫时刻提着个觉——时刻“提着个灯笼”,
那么现在就叫,“时刻举着个太阳”,或者叫“只想过白天不想过黑夜”。
本觉虽然无为的移进了你的世界,但如果你想有为的呆在其中,这又走进了有为法。
对于修行,这不是自然的;这种情况,也必须舍。
修觉之中:开始你时刻提着个觉,提一段时间;
当有一天你进入了本觉,在本觉呆一段时间(其实你不可能出脱它)。
然后都统统的弃舍,你不再追求任何东西,让那些东西来追你。
“哦,觉来了”——它来的正是时刻;“哦,没觉了”——这正是我需要的;
“我又一念来到本觉大光明中了”——哦,知道就行了;“啊,我又从那里出来了”——注意到就可以了。
一旦来到了本觉大光明,就把“觉”念放下吧,觉修结束了。
你干嘛还要拿着提着举着个它?你怕什么?
如果你不怕,没人需要任何法宝;相反,如果你还需要个觉宝,你又迷在觉上了。
过去你迷失在无明念中,现在你又于光明念中迷失;如同,过去你在夜里做梦,现在你在白天做梦一样。那是同一回事。
但,如果你来到了本觉大光明,仍还会有无数无量的妄念来侵犯怎么办?就像白天也遭贼人偷盗一般。
不要想着用你的觉来“克”它,对那些念头做功课。质疑它,让它自动化解,如同以汤销雪。
即使你活在了觉性大光明中,这种质疑念头的功课也是必须的,也是成为货真价实圆满佛的最快方式。
当你活在本觉大光明中,这种质疑念头的功课,是真正的大护法。
没有它,即使你是佛,也仍然会有很多“魔念”来侵扰你,如同佛陀最初成道于菩萨树下,代表五蕴的魔罗的五个女儿来犯他一样。
之于一路觉行,开始你时时提着个觉——叫觉行者;
后来,你进入了觉性大光明并想时刻呆在那个境界里,你叫“空行者”,
再到后来,前两种觉行你都丢了,你就叫“无行者”了,这就是佛了。
佛,如如不动,行而未行,这就是如来,时刻的如来。
诸修行者,这就是“十方薄伽梵,一路涅槃门”的过程。
带觉而行,在觉中行,行在觉中,行而无行,无觉而觉,如来直成。
一点分享,供养十方诸佛菩萨,阿弥陀佛。

android局部变量不能调试问题

在gradle文件把testCoverageEnabled设为false就可以了

buildTypes {
release {
debuggable false
minifyEnabled false //删除没有用到的文件
proguardFiles getDefaultProguardFile(‘proguard-android.txt’), ‘proguard-rules.pro’
}
debug {
debuggable true
testCoverageEnabled false
}

}

lnmp中遇到open_basedir配置无效问题。

在使用LNMP包安装PHP时,发现直接修改php.ini的配置是无法生效的,其原因竟然是因为nginx的配置文件,覆盖了php.ini的配置。
——————————————————————–
LNMP 1.4上如果不想用防跨目录还需要将 /usr/local/nginx/conf/fastcgi.conf 里面的fastcgi_param PHP_ADMIN_VALUE “open_basedir=$document_root/:/tmp/:/proc/”; 删除,需要重启nginx。
LNMP 1.4上也可以直接使用lnmp1.4/tools/ 目录下的 ./remove_open_basedir_restriction.sh 进行移除。