使用kubespray安装k8s时,必须禁用IPV6,否则会导至请求以ipv6方式请求,从而最终无法安装docker-ce等。
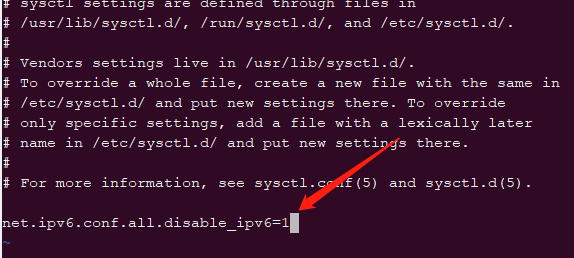
第一步:编辑/etc/sysctl.conf配置,增加net.ipv6.conf.all.disable_ipv6=1

第二步:编辑/etc/sysconfig/network配置,增加 NETWORKING_IPV6=no

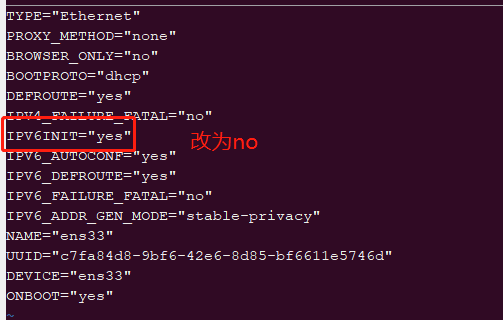
第三步:编辑/etc/sysconfig/network-scripts/ifcfg-ens33,确保IPV6INIT=no是存在。而ifcfg-ens33可能在不同的系统中,是不同的名字。可以先通过ls /etc/sysconfig/network-scripts/检查确认具体名字后,再修改。

第四步:关闭防火墙的开机自启动
systemctl disable ip6tables.service
第五步:执行sysctl -p或者reboot重启命令
第六步:使用ifconfig检查验证ipv6是否真的禁用。
分类目录归档:未分类
安装docker-ce最新版本
移除当前版本:docker-ce版本
rpm -qa | grep docker|xargs yum remove -y
安装最新版本:
curl -fsSL https://get.docker.com/ | sh
离线包下载:https://download.docker.com/linux/centos/7/x86_64/stable/Packages/
一共三个安装文件:
yum localinstall -y
>> docker-ce-20.10.8-3.el7.x86_64.rpm
>> docker-ce-cli-20.10.8-3.el7.x86_64.rpm
>> docker-ce-rootless-extras-20.10.8-3.el7.x86_64.rpm
docker-compose
安卓应用安装脚本
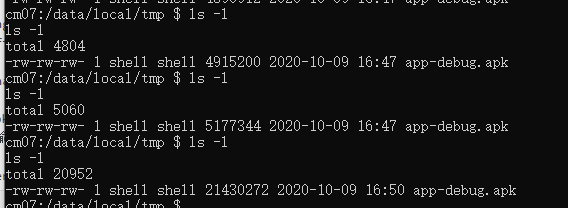
adb install的动作是拆分成两个动作完成的。
首先:adb push file.apk /data/local/tmp
接着:adb pm install /data/local/tmp/file.apk
最后:adb shell “rm -f /data/local/tmp/file.apk”
所以,当采用adb install 时,可登录shell中,直接进入/data/local/tmp目录下,如下图所示。

@echo off

set apkname=%1%

::传入apk路径
echo 您输入了参数:%apkname%

Set filename=%apkname%
set filename=%~nx1
echo 文件名为:%filename%
set folder=%~dp1
echo 路径为:%folder%

tryagaint:
adb connect 192.168.30.22:5555 && adb install %apkname% && goto myexit
timeout /t 10
goto tryagaint

:myexit
echo "success to install"
pause
@echo off

set apkname=%1%

::传入apk路径
echo 您输入了参数:%apkname%

Set filename=%apkname%
set filename=%~nx1
echo 文件名为:%filename%
set folder=%~dp1
echo 路径为:%folder%


adb push %apkname% /data/local/tmp
echo 复制到设备完成!***开始安装,耐心等待***
adb shell pm install -r /data/local/tmp/%filename%
echo ***安装完成***
adb shell rm /data/local/tmp/%filename%
echo ***删除临时文件***
istio-1.6.8的安装过程
istio-1.6.8支持K8s-1.15.7版本。
1.第一步:下载ISTIO-1.6.8并解压,它会解压至istio-1.6.8目录。
2.第二步:进入解压目录,找到istioctl的路径,并添加至环境变量,参考如下所示。
export PATH=$PATH:/root/istio-1.6.8/bin
export KUBERNETES_MASTER="http://172.16.3.244:6443"
3.第三步:安装demo
三、安装ISTIO
istioctl install –set profile=demo
———–错误收集——————
如果是使用K8s离线安装包,进行安装,则可能是已经修改了kubeconfig的路径,则可检查如下方式。
grep -r 'kubeconfig' ./K8s

解决办法:
cp /etc/kubernetes/bootstrap.kubeconfig /etc/kubernetes/admin.conf

cp /etc/kubernetes/admin.conf ~/.kube/config
confluence的破解版
https://github.com/joker8023/confluence
https://blog.csdn.net/weixin_41381248/article/details/80409567
https://blog.csdn.net/sltin/article/details/95491176
k8s的几种快捷安装方式
内置ISTIO的kubeSphere,100%开源。
KubeOperator另一个K8s开源。
https://gitee.com/q7104475/K8s:更简单的方式
1.https://github.com/easzlab/kubeasz,以Ansible工具进行远程安装。
2.https://github.com/fanux/sealos,离线安装
3.kuboard.cn的教程安装
4.rancher管理工具内自带安装引导。
5.基于kubespray工具安装,因为防火墙的原因,需要修改为国内镜像源。
https://blog.csdn.net/forezp/article/details/82730382
https://blog.csdn.net/zhouzixin053/article/details/104418164
其它参考:
https://github.com/kelseyhightower/kubernetes-the-hard-way
https://github.com/opsnull/follow-me-install-kubernetes-cluster
k8s常用命令
1.获取所有命名空间
kubectl get ns
2.获取所有某个命名空间的所有pods
kubectl get pods –namespace nginx-ingress
3.获取命名空间下的所有服务【它会返回服务的IP和端口】
kubectl get svc -n istio-system 或 kubectl get service -n istio-system
[root@k8smaster ~]# kubectl get svc
NAME          TYPE        CLUSTER-IP      EXTERNAL-IP   PORT(S)    AGE
details       ClusterIP   10.96.191.232           9080/TCP   26h
kubernetes    ClusterIP   10.96.0.1               443/TCP    12d
productpage   ClusterIP   10.96.167.107           9080/TCP   26h
ratings       ClusterIP   10.96.29.174            9080/TCP   26h
reviews       ClusterIP   10.96.0.213             9080/TCP   26h
4.直接访问某个服务及相应端号。
curl -v 10.96.167.107:9080
5.容器的IP段为10.100.xxx.xxx,而ClusterIP又是存放在哪里呢?它实际上是不存在的但却是被kube-proxy分配和保存在iptables上的。
iptables -S -t nat
[root@k8sworker ~]# iptables -S -t nat|grep 10.96.167.107
-A KUBE-SERVICES ! -s 10.100.0.0/16 -d 10.96.167.107/32 -p tcp -m comment --comment "default/productpage:http cluster IP" -m tcp --dport 9080 -j KUBE-MARK-MASQ
-A KUBE-SERVICES -d 10.96.167.107/32 -p tcp -m comment --comment "default/productpage:http cluster IP" -m tcp --dport 9080 -j KUBE-SVC-ROH4UCJ7RVN2OSM4
普通用户也可重启nginx
1.修改nginx.conf为abc:root启动
  user  abc abc;  #以普通用户启,但实际上是master为root,worker进程是abc。
或
  user abc root;
2.修改nginx
chown root nginx #nginx必须是root用户拥有者。
chmod a+s nginx  #把x属性改为s属性。
ll nginx
-rwsr-sr-x 1 root root 2030760 Mar  5 11:52 nginx

终端测试验证工具
https://misc.flogisoft.com/bash/home
终端配色:https://misc.flogisoft.com/bash/tip_colors_and_formatting
colors256.sh
#!/bin/bash
for fgbg in 38 48 ; do # Foreground / Background
    for color in {0..255} ; do # Colors
        # Display the color
        printf "\e[${fgbg};5;%sm  %3s  \e[0m" $color $color
        # Display 6 colors per lines
        if [ $((($color + 1) % 6)) == 4 ] ; then
            echo # New line
        fi
    done
    echo # New line
done
exit 0
colors_and_formatting.sh
#!/bin/bash
#Background
for clbg in {40..47} {100..107} 49 ; do
        #Foreground
        for clfg in {30..37} {90..97} 39 ; do
                #Formatting
                for attr in 0 1 2 4 5 7 ; do
                        #Print the result
                        echo -en "\e[${attr};${clbg};${clfg}m ^[${attr};${clbg};${clfg}m \e[0m"
                done
                echo #Newline
        done
done
exit 0
——-
http://invisible-island.net/xterm/ctlseqs/ctlseqs.html
http://www.xfree86.org/current/ctlseqs.html
Linux环境下,主要都是泛VT102的终端,以下是vt102终端。
https://vt100.net/docs/vt102-ug/introduction.html
https://vt100.net/docs/vt102-ug/contents.html
微软的
https://docs.microsoft.com/en-us/windows/console/console-virtual-terminal-sequences
VT100,VT101,
参考开源:https://konsole.kde.org/
headless vt100 emulator
https://github.com/JulienPalard/vt100-emulator
https://github.com/freanux/VTE
自动拉起服务脚本
crontab -e
*/1 * * * * sh /data/scripts/run-flow.sh start
#!/bin/sh

path_current=`pwd`
path_script=$(cd "$(dirname "$0")"; pwd)
mode=$1

logfile=/data/scripts/check.log
app_process=`ps -ef | grep "flowservice"| grep -v grep`
echo `date` >> $logfile
echo "ready to check...." >> $logfile
case "$mode" in
   'start')
        echo "$app_process" >> $logfile
        echo "it's ready to start op...."
        if test -n "$app_process"; then
                echo ""
                echo "$app_process"
                echo ""
        else
                cd $path_script   #进入脚本所在目录下,目的是使springboot的config目录生效。
                nohup /data/code/service.flow.wps.cn/flowservice --config=/data/code/service.flow.wps.cn/config/config-prod.toml > /data/code/service.flow.wps.cn/info.txt 2>&1 &
                echo "success to restart flowservice" >> $logfile
                cd $path_current

        fi

        echo 'success to start.'
        ;;
   'stop')
        echo "it's ready to check process..."
        if test -n "$app_process"; then
                echo "had find app process informaton"
                echo $app_process | awk '{print ($2)}' | xargs kill -9
        fi
        echo 'success to kill.'
        ;;
    *)
        basename=`basename "$0"`
        echo "Usage: $basename  {start|stop}  [ server options ]"
        exit 1
        ;;
esac
exit 1