分类目录归档:PHP开发

yii的URL美化

ULR美化需要nginx的配合完成的。
本人是使用阿里云的lnmp构建。故以其为例,记录如下:
1.nginx的配置如下:
首先是rewrite规则,在/alidata/server/nginx/conf/rewrite目录下增加aixuefo.conf文件,其内容如下:

location / {
if (-f $request_filename/index.html){
rewrite (.*) $1/index.html break;
}
if (-f $request_filename/index.php){
rewrite (.*) $1/index.php;
}
if (!-f $request_filename){
rewrite (.*) /index.php;
}
}

接着是主站的配置,在/alidata/server/nginx/conf/vhosts目录下新增aixuefo.conf文件,其内容如下:
server {
listen 80;
server_name www.aixuefo.com aixuefo.com;
index index.html index.htm index.php;
root /alidata/www/aixuefo;
location ~ .*\.(php|php5)?$
{
fastcgi_pass unix:/alidata/server/php/var/run/php5-fpm.sock;
#fastcgi_pass 127.0.0.1:9132;
fastcgi_index index.php;
include fastcgi.conf;
}
location ~ .*\.(gif|jpg|jpeg|png|bmp|swf)$
{
expires 30d;
}
location ~ .*\.(js|css)?$
{
expires 1h;
}
#伪静态规则
include /alidata/server/nginx/conf/rewrite/aixuefo.conf;
access_log /alidata/log/nginx/access/aixuefo.log;
}

然后是yii的组件配置:如下
‘urlManager’=>[
‘enablePrettyUrl’=>true,
‘rules’=>[
// ‘dashboard’ => ‘site/index’,
//
// ‘POST s’ => ‘/create’,
// ‘s’ => ‘/index’,
//
// ‘PUT /‘ => ‘/update’,
// ‘DELETE /‘ => ‘/delete’,
// ‘/‘ => ‘/view’,
// ‘//‘ => ‘/‘,
‘posts’ => ‘post/default/list’, 只测试这个小小例子
],

],
配置PHP环境变量

使用阿里LNMP,故其环境变量配置如下:
1.#vi /etc/profile
如增加一个环境变量:
export MY_REDIS_HOST="localhost"
——————-
2.修改php-fpm.conf,设置PHP环境变量:
#vi /etc/php5/fpm/php-fpm.conf
增加:
env[MY_REDIS_HOST]=$MY_REDIS_HOST

——————————-
3.在/etc/init.d/php-fpm脚本的合适位置添加:. /etc/profile。
php_fpm_BIN=${exec_prefix}/sbin/php-fpm
php_fpm_CONF=${prefix}/etc/php-fpm.conf
php_fpm_PID=${prefix}/var/run/php-fpm.pid

. /etc/profile # i'm here.

php_opts="--fpm-config $php_fpm_CONF --pid $php_fpm_PID"

wait_for_pid () {
注意,点号与路径之间有空格。实际上.与source是一样的,但是这里用source会报错
还要修改/etc/profile的权限,因为php-fpm启动用户是www-data , 而/etc/profile的权限用户为root,这里为了简章,将/etc/profile的权限设为“777”,即:
#chmod 777 /etc/profile
————————
4.修改php.ini配置。
因为php.ini默认不载入$_ENV变量定义,如果此时查看phpinfo(),会发现我们设置的环境变量为”no value”。
#vi /etc/php5/fpm/php.ini
修改:variables_order为:
variables_order="EGPCS"
————–
5.重启php-fpm
#service php5-fpm restart
6.测试设置结果。
查看phpinfo(),在”Enviroment variables” 一节与“PHP variables”一节内可能看到我们刚才设置的变量名及变量值。

base32源码

= 5) {
$vbits -= 5;
$output .= $BASE32_ALPHABET[$v >> $vbits];
$v &= ((1 << $vbits) - 1); } } if ($vbits > 0) {
$v <<= (5-$vbits); $output .= $BASE32_ALPHABET[$v]; } return $output; } function base32_decode($input) { $output = ''; $v = 0; $vbits = 0; for($i = 0, $j = strlen($input); $i < $j; $i++) { $v <<= 5; if ($input[$i] >= 'a' && $input[$i] <= 'z') { $v += (ord($input[$i]) - 97); } elseif ($input[$i] >= '2' && $input[$i] <= '7') { $v += (24 + $input[$i]); } else { exit(1); } $vbits += 5; while($vbits >= 8){
$vbits -= 8;
$output .= chr($v >> $vbits);
$v &= ((1 << $vbits) - 1); } } return $output; } $encode = base32_encode('肖斌-https://xiaobin.net/'); $decode = base32_decode($encode); var_dump($encode, $decode); ?>

前端播放器资源

http://www.52player.com/
以上网站收集了当前各种流行的前端播放器,很值得收藏。
以下是本人下载并测试的播放器:
http://pan.baidu.com/s/1mg7n8yk,该功能相对简单,一般情况够用。
http://pan.baidu.com/s/1dD2IgFZ,该功能丰富,提供多种形式的播放器:如列表模式,JS交互模式,经典模式等,真是包括各种情况。官方主页为http://www.alsacreations.fr/dewplayer.html,教程也相当丰富。
http://www.spencer-tech.com/,开源的播放器,可以自由修改(http://pan.baidu.com/s/1sjkcOFV),有三种模式,MINI模式、列表模式、列表专辑模式,皮肤和大小可自由调整,是目前最好的音乐控件。

centos5.8下调试PHP

1.使用阿里lnmp一键安装包安装lnmp环境(php5.4.x)。http://xiazai.jb51.net/201407/tools/aliyun-sh-1.3.0.rar
2.安装phpstorm8.0.1
3.安装xdebug-2.2.2,以下php.ini参数配置是结合wamp2.4分析下完成。

tar zxvf xdebug-XDEBUG_2_2_2.tar.gz
cd xdebug-XDEBUG_2_2_2
phpize
./configure –enable-xdebug –with-php-config=/alidata/server/php-5.4.23/bin/php-config
make
cp modules/xdebug.so /alidata/server/php-5.4.23/bin/xdebug.so
修改php.ini(建议在phpinfo();里面看php.ini文件路径)
vim /alidata/server/php-5.3.18/etc/php.ini
新增以下:
[Xdebug]
zend_extension =/alidata/server/php-5.4.23/bin/xdebug.so
xdebug.remote_enable = On
xdebug.profiler_enable = On
xdebug.profiler_enable_trigger = On

xdebug.auto_trace = on
xdebug.auto_profile = on
xdebug.collect_params = on
xdebug.collect_return = on
xdebug.profiler_enable = on
xdebug.trace_output_dir = “/alidata/log/xdebug”
xdebug.profiler_output_dir = “/alidata/log/xdebug”
xdebug.dump.GET = *
xdebug.dump.POST = *
xdebug.dump.COOKIE = *
xdebug.dump.SESSION = *
xdebug.var_display_max_data = 4056
xdebug.var_display_max_depth = 5

**********************************************************************
注意:如果您安装过zend optimizer或者ZendGuardLoader那么,注意您的php.ini文件中是否已存在zend_extension= ,
如果已经存在,请注释掉,在zend_extension=前加上“;” ,这样,才可以正常安装运行好xdebug.示例:
;zend_extension=”/usr/local/lib/php/20060613/ZendExtensionManager.so”
;zend_extension=/alidata/server/php/lib/php/extensions/no-debug-non-zts-20100525/ZendGuardLoader.so
**********************************************************************
cd /tmp
mkdir xdebug

chmod -R 777 xdebug/
——————————————————————————————-
以下是完整的wamp2.4的配置,仅参考使用。

; XDEBUG Extension

zend_extension = “f:/wamp/bin/php/php5.4.16/zend_ext/php_xdebug-2.2.3-5.4-vc9.dll”

[xdebug]
xdebug.remote_enable = On
xdebug.profiler_enable = On
xdebug.profiler_enable_trigger = On
xdebug.profiler_output_name = cachegrind.out.%t.%p
xdebug.profiler_output_dir = “f:/wamp/tmp”

解决windows下Composer因php_openssl扩展缺失而安装失败的问题

安装Composer提示如下错误:

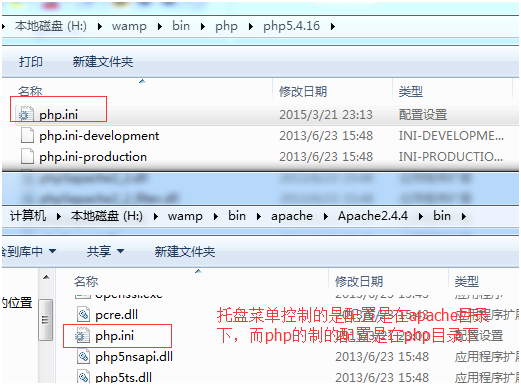
原因是cmd.exe命令行模式控制php所使用配置和托盘菜单里的php.ini是两个不同的路径,因此造成开启托盘菜单里的openssl仍无法解决上述问题的假像。

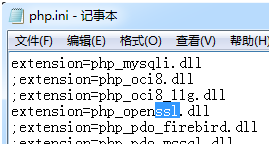
因为找开php目录下的配置文件,去掉openssl的前面分号,然后重启服务,即可解决上述问题

使用fastcgi_finish_request去操作耗时的事情

在访问时,要求在返回相应的数据给客户端后,后续仍需要去处理一些其它事情,例如写日志或跨站访问等,可以使用fastcgi_finish_request来立即响应数据返回并关闭网络,然后继续处理后续的工作。

<?php
echo ‘gomytest:’.date(‘Y-m-d H:i:s’);
file_put_contents(‘log.txt’, date(‘Y-m-d H:i:s’) . ” test1\n”, FILE_APPEND);
if (function_exists(“fastcgi_finish_request”)) {
      function fastcgi_finish_request()  {
      }
}
sleep(10);
file_put_contents(‘log.txt’, date(‘Y-m-d H:i:s’) . ” test2\n”, FILE_APPEND);
sleep(10);
file_put_contents(‘log.txt’, date(‘Y-m-d H:i:s’) . ” test3\n”, FILE_APPEND);
?>  

测试的结果是能立即返回,并正确处理后续操作。

image