https://github.com/android/ndk-samples
作者归档:xinlu
安装ISTIO-1.6.8版本
承接上K8s的安装教程,继续安装ISTIO。
因为ISTIO具备完整的监控,包括grafana/prometheus等,故需要先删除原集群的相关监控,然后按istio方式部署。
第一步:检查目标K8s是否满足安装istio的条件。
istio x precheck
第二步:安装示范DEMO
istioctl install --set profile=demo
安装结束后,可用命令检查是否安装完整
 istioctl verify-install

K8s离线版本安装全过程
本人克隆了一份:https://gitee.com/kxtry/K8s
原来开源位置:https://gitee.com/q7104475/K8s
本人环境配置:
Master节点 : 172.16.3.244
工作节点 : 172.16.3.245 172.16.3.248
必须保证所有节点密码一致,且以root帐号运行。
第一步:下载离线包:
本人百度云盘:
链接:https://pan.baidu.com/s/1Dok1vqn8G0AhUkl_l12e6Q
提取码:09cu
或者去开源仓库下载:http://www.linuxtools.cn:42344/K8s_1.3.2.tar
http://www.linuxtools.cn:42344/目录下,有很多宝贝。
http://www.linuxtools.cn:42344/K8s_list/是K8s离线下载包。
第二步:上传至master机【如果master多台,则只需要上传其中一台就可以了,但必须是master的节点,其它节点执行脚本,会出部署故障。】
第三步:进入解压K8s目录【这个目录不能修改,修改为其它可能会有问题】,执行install.sh脚本。
第四步:选择”Cluster K8s One-click”项。
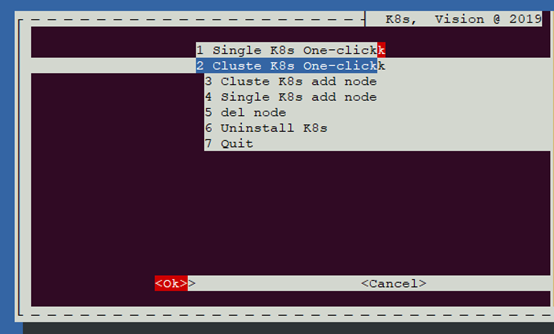
第五步:确认导入集群IP列表
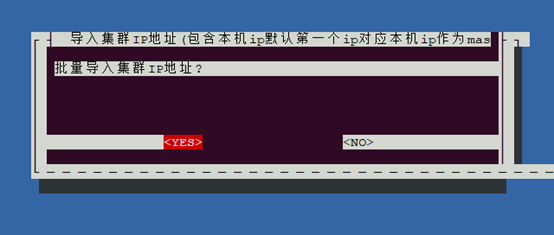

注:默认第一个IP为Master-1。
第六步:选择集群FS,选择NFS模式,【不要选择GlusterFS类型,因为其要求挂载没有格式化的磁盘】
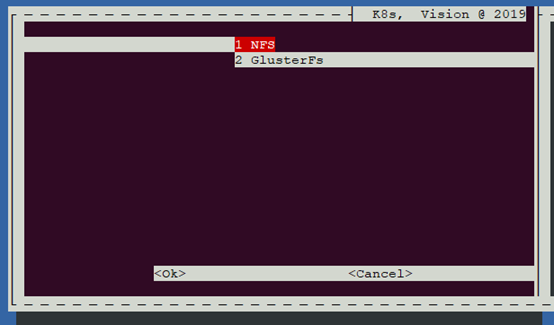
第七步:输入Root密码【集群中每台主机的root帐号密码都必须一致】
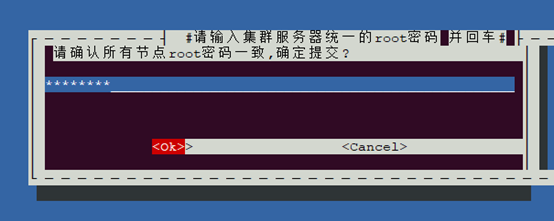
第八步:再次确认MasterIP
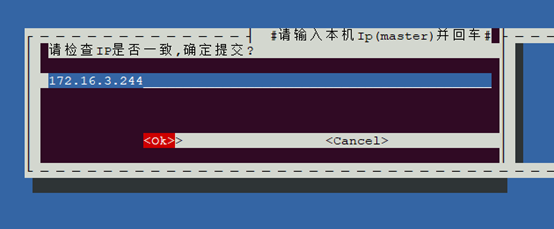
第九步:大约10分钟的安装等待
因为它是采用ansible推送的方式安装,它是会主动连接每台主机,把当前解压包内的相关文件推送至相关集群机上安装
第十步:安装完成,提示相关服务的访问方式
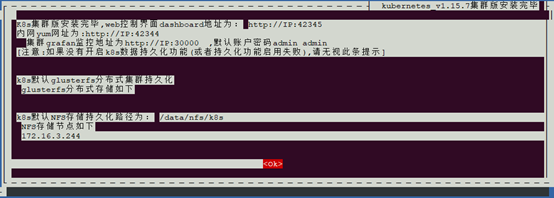
第十一步:检查服务健康状态和清理安装临时文件,这步骤所有安装执行完毕。
———————————————————————————-
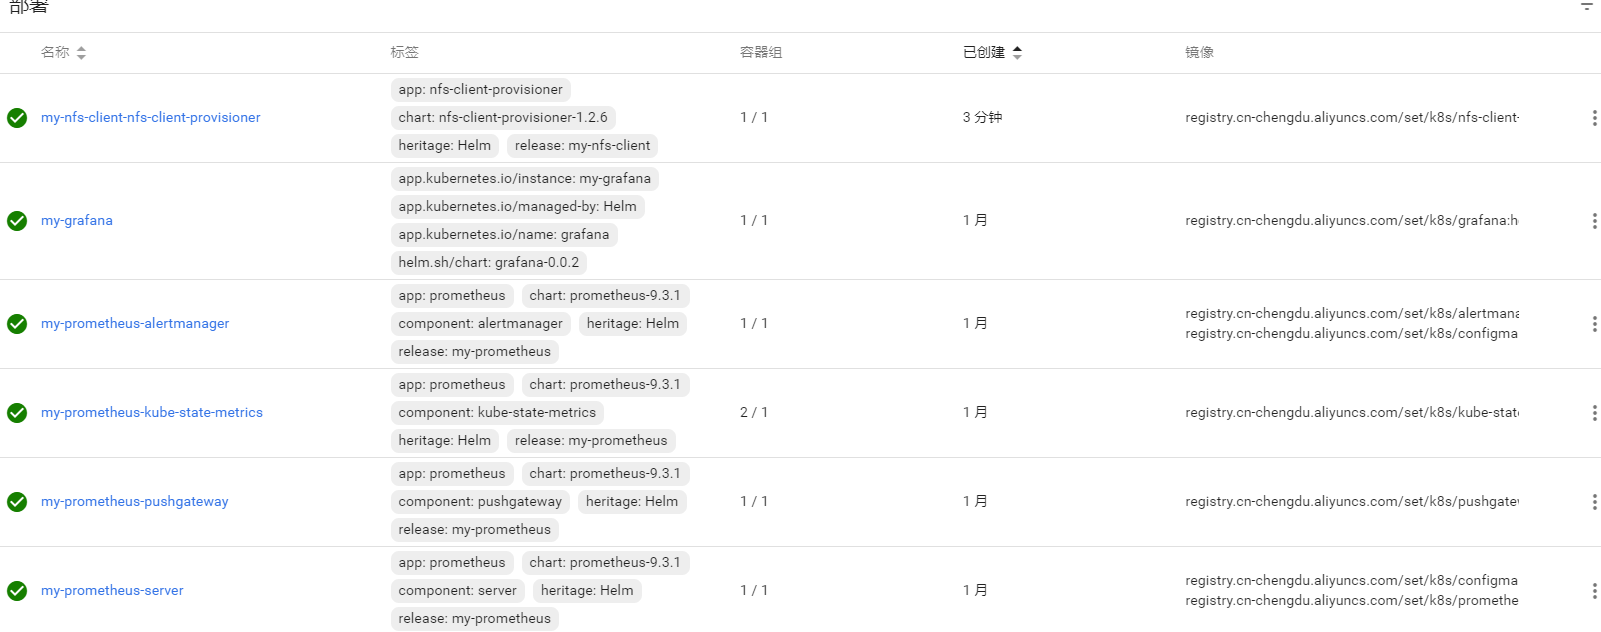
在1.3.2离线安装包上,会存在NFS没有正确安装的情况,故需要手动再补一刀,如下情况所示:
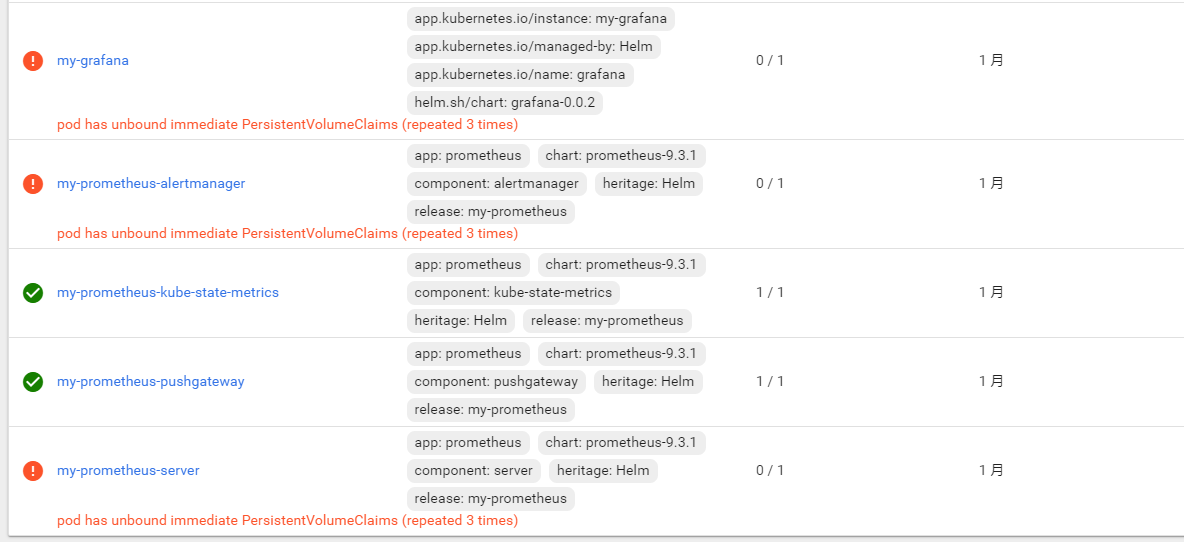
解决方法:
sh /root/K8s/nfs/nfs_install.sh
———————————————————————————
因为本离线kubectl已经赋加相关权限,故没有安装其它应用如ISTIO,是不需要生成admin.kubeconfig配置的。
但有部分应用可能引用~/.kube/config,也即admin.kubeconfig配置,故可按以下方式生成。
vim generate_admin_kubeconfig.sh文件
#!/bin/sh
MASTER_IP=$1
if [ "${MASTER_IP}" == "" ];then
   echo "should add master ip parameter"
   exit
fi

cd /etc/kubernetes/ssl
cat > admin-csr.json  <<  'EOF'
{
    "CN": "admin",
    "hosts": [],
    "key": {
        "algo": "rsa",
        "size": 2048
    },
    "names": [
        {
            "C": "CN",
            "ST": "beijing",
            "L": "beijing",
            "O": "od",
            "OU": "ops"
        }
    ]
}
EOF

cfssl_linux-amd64 gencert -ca=ca.pem -ca-key=ca-key.pem -config=ca-config.json -profile=kubernetes admin-csr.json | cfssljson_linux-amd64 -bare admin

#生成集群配置文件
kubectl config set-cluster myk8s \
--certificate-authority=/etc/kubernetes/ssl/ca.pem \
--embed-certs=true \
--server=https://${MASTER_IP}:6443 \
--kubeconfig=kube-admin.kubeconfig

# 设置admin管理账号
kubectl config set-credentials admin \
--client-certificate=/etc/kubernetes/ssl/admin.pem \
--client-key=/etc/kubernetes/ssl/admin-key.pem \
--embed-certs=true \
--kubeconfig=kube-admin.kubeconfig

#绑定账号和管理的集群
kubectl config set-context myk8s-context \
--cluster=myk8s \
--user=admin \
--kubeconfig=kube-admin.kubeconfig

#选择指定集群 一般在需要远程控制的机器上操作
kubectl config use-context myk8s-context --kubeconfig=kube-admin.kubeconfig

#绑定账号到指定的角色
cat  >  k8s-admin.yaml  << 'EOF'
apiVersion: rbac.authorization.k8s.io/v1
kind: ClusterRoleBinding
metadata:
  name: admin
roleRef:
  apiGroup: rbac.authorization.k8s.io
  kind: ClusterRole
  name: cluster-admin
subjects:
- apiGroup: rbac.authorization.k8s.io
  kind: User
  name: admin
EOF

kubectl apply -f k8s-admin.yaml
kubectl get clusterrolebinding  admin   -o yaml

cp kube-admin.kubeconfig ~/.kube/config -f
kubespray国内加速脚本
因为墙的原因,无法下载国外文件,因此需要将某些下载域名转换成国内镜像域名。
参考:https://gitee.com/kxtry/kubespray-k8s-installation/tree/master
-----------------------------
#参照gcr.io替换所有域名
grep -rl 'gcr.io' ./|xargs sed -i "s/gcr.io/gcr.azk8s.cn/g"
grep -rl 'quay.io' ./|xargs sed -i "s/quay.io/quay.azk8s.cn/g"

docker.io -> dockerhub.azk8s.cn (其中官方镜像需要加library/)
quay.io ->  quay.azk8s.cn
gcr.io -> gcr.azk8s.cn
k8s.gcr.io -> gcr.azk8s.cn/google-containers
-----------------------------------------------
vim roles/container-engine/docker/defaults/main.yml修改以下内容。
docker_rh_repo_base_url: 'https://mirrors.aliyun.com/docker-ce/linux/centos/7/$basearch/stable'
docker_rh_repo_gpgkey: 'https://mirrors.aliyun.com/docker-ce/linux/centos/gpg'

# CentOS/RedHat Extras repo
extras_rh_repo_base_url: "https://mirrors.aliyun.com/centos/$releasever/extras/$basearch/"
extras_rh_repo_gpgkey: "https://mirrors.aliyun.com/centos/RPM-GPG-KEY-CentOS-7"
彻底禁用IPV6
使用kubespray安装k8s时,必须禁用IPV6,否则会导至请求以ipv6方式请求,从而最终无法安装docker-ce等。
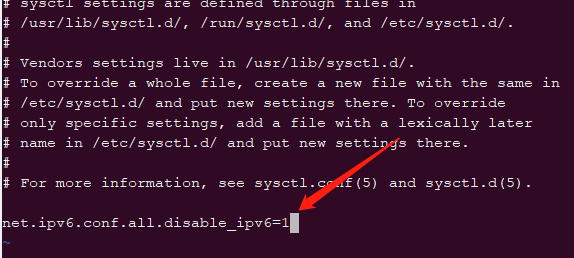
第一步:编辑/etc/sysctl.conf配置,增加net.ipv6.conf.all.disable_ipv6=1
第二步:编辑/etc/sysconfig/network配置,增加 NETWORKING_IPV6=no

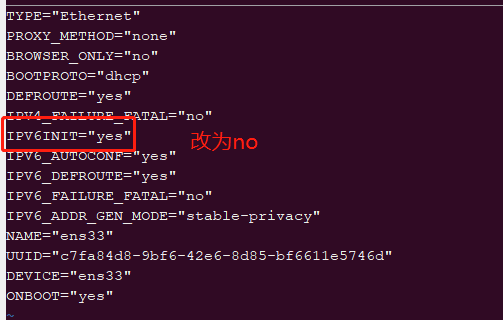
第三步:编辑/etc/sysconfig/network-scripts/ifcfg-ens33,确保IPV6INIT=no是存在。而ifcfg-ens33可能在不同的系统中,是不同的名字。可以先通过ls /etc/sysconfig/network-scripts/检查确认具体名字后,再修改。
第四步:关闭防火墙的开机自启动
systemctl disable ip6tables.service
第五步:执行sysctl -p或者reboot重启命令
第六步:使用ifconfig检查验证ipv6是否真的禁用。
安装docker-ce最新版本
移除当前版本:docker-ce版本
rpm -qa | grep docker|xargs yum remove -y
安装最新版本:
curl -fsSL https://get.docker.com/ | sh
离线包下载:https://download.docker.com/linux/centos/7/x86_64/stable/Packages/
一共三个安装文件:
yum localinstall -y
>> docker-ce-20.10.8-3.el7.x86_64.rpm
>> docker-ce-cli-20.10.8-3.el7.x86_64.rpm
>> docker-ce-rootless-extras-20.10.8-3.el7.x86_64.rpm
docker-compose
K8s安装过程
通过kubespray实现k8s的安装记录【https://github.com/kubernetes-sigs/kubespray】。
所使用的分支是release-2.11。\
——————kubespray加速方案—————-
https://github.com/wiselyman/k8s-installation
https://blog.csdn.net/zhouzixin053/article/details/104418164
—————–禁用IPV6————————-
以下是Centos7.8的祼系统的安装部署过程。
操作前必须禁用IPV6,否则在安装docker等默认使用ipv6连接。
如下图:

彻底禁用IPV6方法:http://www.kxtry.com/archives/3044
——————————————
虚拟机配置:2核4G, IP: 192.168.10.130 192.168.10.134
第一步:在执行kubespray脚本前的环境准备,从release-2.11这个版本,默认是使用python3来安装了,故需要安装python3。
注:请不要使用python2进行安装,本人经验证确认在执行【CONFIG_FILE=inventory/myk8s/hosts.yml python3 contrib/inventory_builder/inventory.py ${IPS[@]}】动作时,会出错,且无法解决。
1.yum install -y python3 python3-pip python3-devel
2.mkdir -p ~/.pip/ && vi ~/.pip/pip.conf,添加如下内容:
[global]
index-url=http://mirrors.aliyun.com/pypi/simple    【尽量不要使用https的源,有可能某些源会严格检查SSL是否过期之类,从而导致安装出错】
trusted-host=mirrors.aliyun.com
第二步:配置服务器免密互信
ssh-keygen -t rsa -C "abc@admin.com"
ssh-copy-id 192.168.10.130
第三步,安装必须组件。
1.pip3 install -r requirements.txt
直至最后提示以下成功信息

第三步:进入kubespray的release-2.11分支安装单机版本。
mkdir inventory/myk8s
declare -a IPS=(192.168.10.137 192.168.10.138) 【这里是空格隔开,不是逗号】
CONFIG_FILE=inventory/myk8s/hosts.yml python3 contrib/inventory_builder/inventory.py ${IPS[@]}
ansible-playbook -i inventory/myk8s/hosts.yml --become --become-user=root cluster.yml  -vvv --flush-cache【-vvv是显示安装细节过程,--flush-cache是清理操作缓存】
—————————-
加快安装效率及降低翻墙影响,可直接下载K8s离线包。
http://linuxtools.cn:42344/K8s_list/
安卓应用安装脚本
adb install的动作是拆分成两个动作完成的。
首先:adb push file.apk /data/local/tmp
接着:adb pm install /data/local/tmp/file.apk
最后:adb shell “rm -f /data/local/tmp/file.apk”
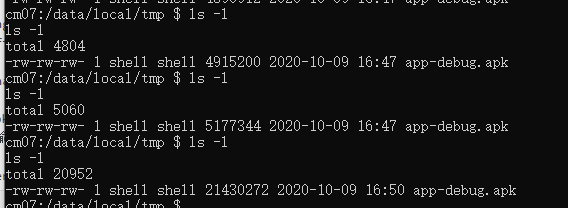
所以,当采用adb install 时,可登录shell中,直接进入/data/local/tmp目录下,如下图所示。
@echo off

set apkname=%1%

::传入apk路径
echo 您输入了参数:%apkname%

Set filename=%apkname%
set filename=%~nx1
echo 文件名为:%filename%
set folder=%~dp1
echo 路径为:%folder%

tryagaint:
adb connect 192.168.30.22:5555 && adb install %apkname% && goto myexit
timeout /t 10
goto tryagaint

:myexit
echo "success to install"
pause
@echo off

set apkname=%1%

::传入apk路径
echo 您输入了参数:%apkname%

Set filename=%apkname%
set filename=%~nx1
echo 文件名为:%filename%
set folder=%~dp1
echo 路径为:%folder%


adb push %apkname% /data/local/tmp
echo 复制到设备完成!***开始安装,耐心等待***
adb shell pm install -r /data/local/tmp/%filename%
echo ***安装完成***
adb shell rm /data/local/tmp/%filename%
echo ***删除临时文件***
istio-1.6.8的安装过程
istio-1.6.8支持K8s-1.15.7版本。
1.第一步:下载ISTIO-1.6.8并解压,它会解压至istio-1.6.8目录。
2.第二步:进入解压目录,找到istioctl的路径,并添加至环境变量,参考如下所示。
export PATH=$PATH:/root/istio-1.6.8/bin
export KUBERNETES_MASTER="http://172.16.3.244:6443"
3.第三步:安装demo
三、安装ISTIO
istioctl install –set profile=demo
———–错误收集——————
如果是使用K8s离线安装包,进行安装,则可能是已经修改了kubeconfig的路径,则可检查如下方式。
grep -r 'kubeconfig' ./K8s

解决办法:
cp /etc/kubernetes/bootstrap.kubeconfig /etc/kubernetes/admin.conf

cp /etc/kubernetes/admin.conf ~/.kube/config
客户端反向代理
reverse proxy for lot
https://github.com/fatedier/frp